Ranger I Meter - RT's Radio Home Page
Main menu:
-
 Home Page
-
Amateur Radio
- Caution: READ THIS FIRST!
- Bitten By the Radio Bug
- Station
- Vintage Transmitters
- Vintage Receivers
- Field Day
- Micellaneous Tube Projects
- E.F. Johnson Restoration
- Test Equipment
- British Iron
- Contact
Ranger I Meter
Amateur Radio > E.F. Johnson Restoration
Viking Ranger meter:
Dead meter in your Viking Ranger I? If the meter has no electrical conitinuity, unless an interior wire has come loose from one of the studs, there is little hope in repairing it. The good news is the meter movement from a Viking Valiant I measures 20 ohms across the coil which is identical to the Ranger meter. Only the Valiant needle is longer, and the meter faces mount differently; the good news is the Ranger's meter face mounting hardware can easily be transferred to the Valiant meter, and the needle is easily trimmed. Since Viking Ranger I's are in higher demand than Viking Valiant I's, there are more Valiant "parts rigs" out there.
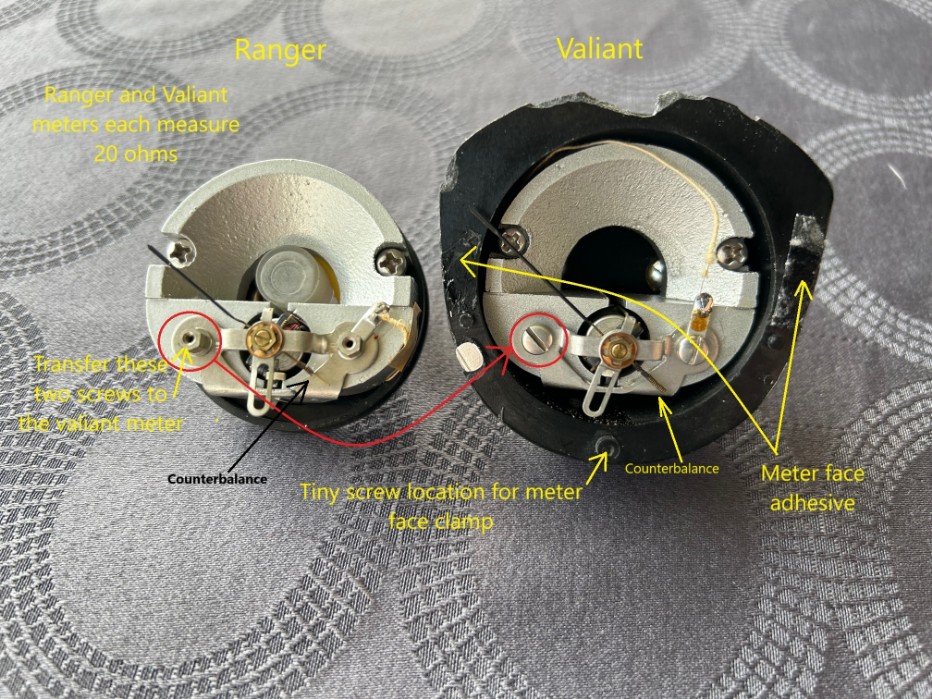
In the photo above, the Ranger I meter is on the left, and the Valiant I meter is on the right.
Important: These meters are fitted with magnets inside. Be certain the area you are working is clean and free from any metal filings, etc. that might be drawn into the meter magnet. These filings will cause the meter movement to stick, essentially ruining the meter. It may not be possible to remove these filings.
The Valiant meter is a little complicated.
1. From the backside of the meter bezel, remove the tiny screw and clamp at the lowermost portion of the bezel.
2. Carefully remove the bezel starting from the the area where the tiny screw/clamp was removed. This may be done by hand, but if difficult, use careful leverage with a suitable tool. ***Be careful to not touch the meter needle unnecessarily; the meter movement is very fragile and can easily be damaged.***
3. Remove the metal meter face. It was attached by a bit of adhesive in the areas shown in the photo. If it does not easily lift off, use a small flat blade scewdriver to
carefully and slowly lift the face.
4. Pause here and start disassembly of the Ranger meter.
The Ranger meter disassembly is straightforward and is easily done.
1. Note the length of the the Ranger meter needle in regards to the meter scale. The Valiant needle will be cut to this length later on.
2. Remove the three tiny beveled screws on the periphery of the meter case, and remove the meter contents.
3. The meter face is held by two small screws and is easily removable. Remove these and keep for reassembly.
4. Remove the hollow studs and relocate them *one at a time* to the Valiant meter. See photo.
5. Remove the existing Ranger meter contents and set aside.
Reassembling Ranger I meter.
1. Carefully remove the nuts from the long studs from the Valiant meter case.
2. Carefully handling the Valiant meter contents, insert the studs into the Ranger meter case.
3. Place the taped wire loop in the Ranger meter case in the same position it was found in the Valiant meter case. Tighten the nuts on the studs while keeping the studs from turning. Carefully snug the nuts, and avoid overtightening.
4. Check that the meter assembly is centered in the meter case. Adjust as necessary. Install meter face being careful to avoid touching the needle.
5. Carefully cut the needle to the length of the original Ranger needle with sharp diagonal cutters or nail clipper. There is a small amount of counterbalance at the other end of the needle. I removed a small amount of this to account for the shortened needle.
The result: A Ranger meter saved! Wiring it in parallel with another Ranger meter, the readings are one meter graduation apart, so it is close enough. Who is to say which meter is the more accurate?